When I became a Jira administrator, the most confusing part of project administration was how screens, screen schemes, and issue type screen schemes worked together. Huh? All I wanted to do was to change a few fields around and instead, I found myself lost in a confusing combination of settings that didn’t make any sense to me. Shouldn’t it be easier? Once I understood the relationship however, I saw how powerful these settings are when they work together. Let’s start out with some simple definitions.
Screens
Screens define which fields are present and their display order. Jira Server and Jira Cloud “Classic” projects have four types of screens. They are:
- Create: A screen for creating a new issue
- This screen collects the initial information from the Reporter. It often contains just a few of the most important and required fields.
- Edit: A screen for editing an existing issue
- This screen contains all the fields a user is able to complete or update.
- View: A screen for viewing an issue’s details
- This screen contains all the fields a user is able to view.
- Note: Jira Server and Jira Cloud “Classic” projects only display fields that have data. For example, if the “Due Date” field is empty, you won’t see it on an issue’s view screen.
- Transition: A screen that is displayed during a workflow transition
- This screen is often used to collect or update data at different points in an issue’s lifecycle. For example, the “Resolution” field value is collected before an issue reaches its final workflow status.
- Tip: Distinguish your transition screens from other screens by naming them with a “(T)”. Example screen name: Assignment (T). See screenshot.
You can have one screen, or one set of screens, for all issues in your project. Or you can have different screens for each issue type. We’ll talk more about that in the “Issue Type Screen Scheme” section below.
Jira Cloud “Next-gen” projects work differently however. There’s just one screen per project or per issue type and no distinction between the create, edit, and view operations. “Next-gen” projects treat empty fields differently as well. An empty field displays with the word “None” below it, as pictured.
Fields and Ordering
In all versions of Jira, screens display both standard and custom fields.
Some fields can be ordered as desired by rearranging them on the admin view of the screen. Other fields are automatically placed and grouped together. For example, all user-picker fields (“Assignee”, “Reporter”, etc) appear together on the right side of an issue’s screen. All date fields (“Due Date”, “Created Date”, “Updated Date”) also appear together on the right.
Screen Schemes
Jira Server and Jira Cloud “Classic” projects have Screen Schemes.
Remember the “create”, “edit”, and “view” operations above? This scheme associates one or more screens with an operation.
In this simple example, there’s one screen for each operation.
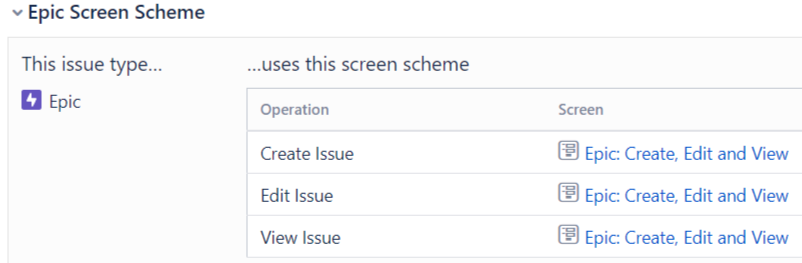
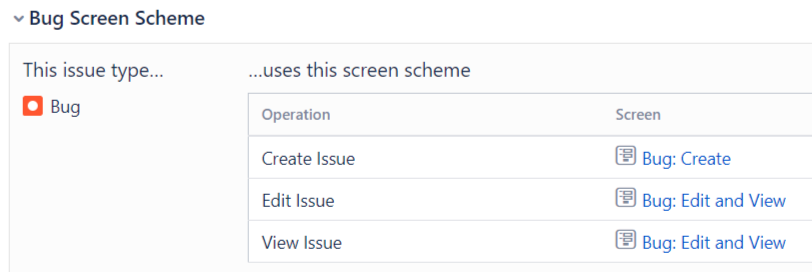
In this more complex example, there is one screen for the “create” operation and another screen for the “edit” and “view” operations.
A Screen Scheme can have as little as one screen shared by all operations or as many as three screens, with one screen for each operation.
Why Multiple Screens?
I recommend starting with one screen shared by the “create”, “edit”, and “view” operations in your project. If that screen becomes cluttered with too many fields, or if information needs to be collected during different stages of the workflow, then consider using multiple screens.
Issue Type Screen Schemes
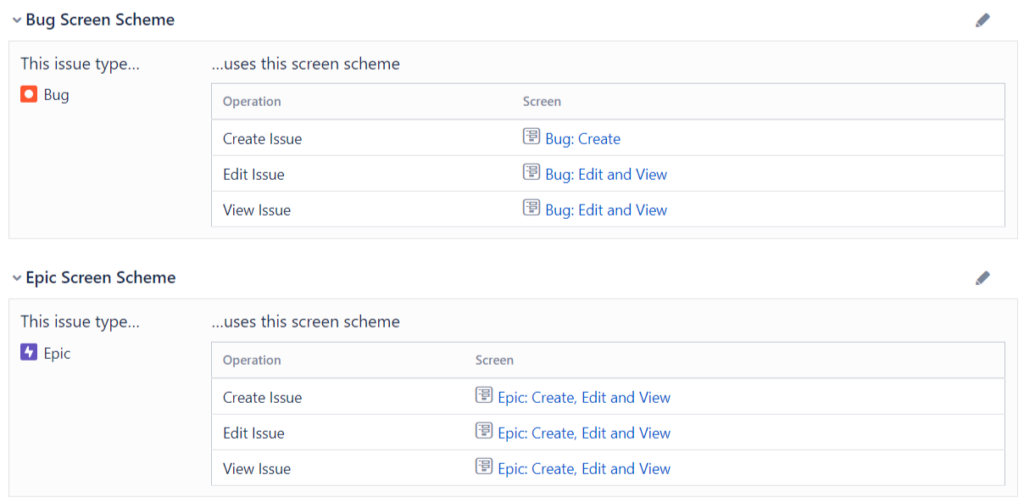
Jira Server and Jira Cloud “classic” projects also have one final setting called an Issue Type Screen Scheme. This scheme associates screens with different issue types. Just like you can have different screens for different operations, you can have one set of screens for your Bugs, one set for your Stories, and another set for your Tasks.
This Issue Type Screen Scheme has two Screen Schemes. The Bug issue type uses the “Bug Screen Scheme” which has two screens. The Epic issue type uses the “Epic Screen Scheme” which has one screen.
Tying it Together
Screens, Screen Schemes, and Issue Type Screen Schemes work together to power your project. Atlassian explains this relationship in this diagram.
It look me a long time to understand these concepts. I recommend you re-read this article and experiment in your own Jira test environment, until the relationship between these settings is clear.
Jira Service Desk Request Forms
If you have Jira Service Desk, there’s another type of “screen” to be aware of. When Service Desk Agents login to Jira, they see the typical Jira screens described above. When Service Desk Customers login to the Customer Portal however, they see request forms.
Request forms provide a simpler and streamlined issue view, which is great for less technical audiences. Customers need no Jira knowledge to use the portal to submit their request.
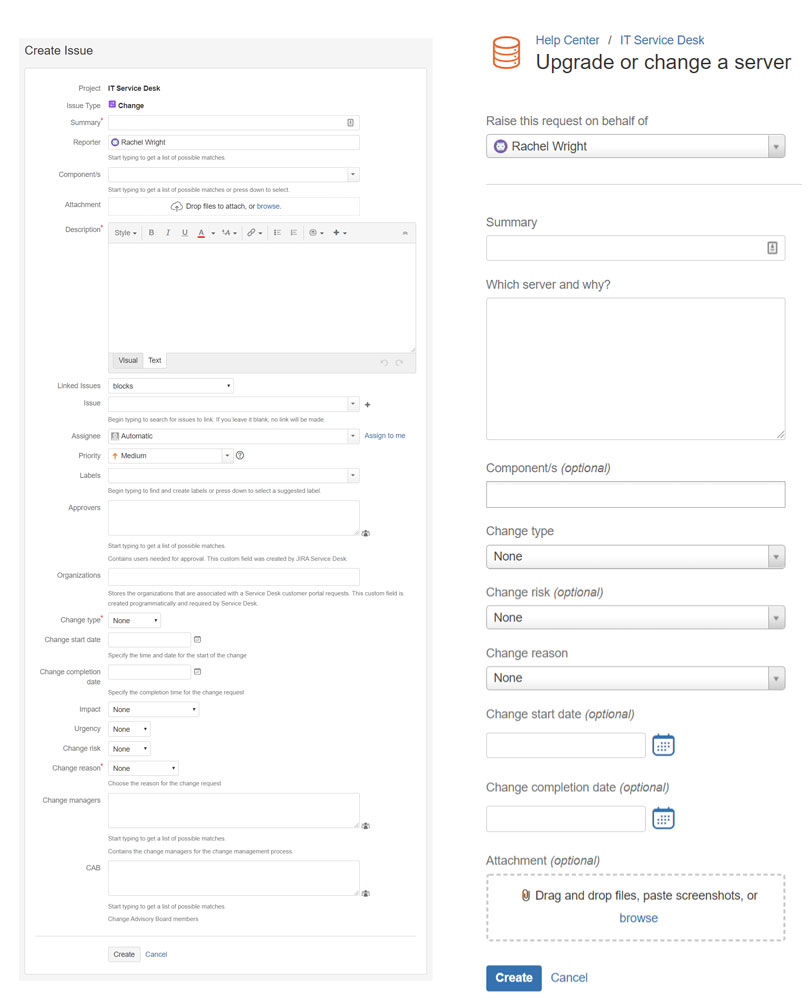
In the example below, the left image shows a default Jira create screen, which contains 21 fields. The right image shows a default Jira Service Desk change request form, which contains only 10 fields. Which one looks easier to complete?
Best Practices
Make your screens and schemes as easy, efficient, and reusable as possible. Here are some recommendations:
As With all Forms
- Don’t collect data you won’t query on or actually use
- List fields in the order a user would likely supply the information
- Order fields consistently between issues types in a project and between projects. Users expect and appreciate a standard.
- Example: The “Summary” field is always first, the “Description” field is always second, etc.
For Jira Server and Jira Cloud “Classic” Projects
- Use a single screen for all operations (“create”, “edit”, “view”) until there’s a real need for additional screens.
- Consider additional screens when there are too many fields or if information needs to be collected during different stages of the workflow.
- On the “create” screen:
- Only include the most important and required fields. Too many fields overwhelm users. Too many fields also impacts loading and performance.
- Only include fields relevant to the Reporter. For example, if a business team member is reporting a Bug, they can’t provide an effort estimate and won’t know which code version is impacted. Don’t show the “Story Points”, “Original Estimate” or “Affects Version” fields. Instead, add these fields to your “edit” and “view” screens. You can also prompt a development team member for that information, later in the workflow, using a “transition” screen.
- Create a single screen and a single screen scheme, for all issue types, until more are needed.
- Example: You want the custom fields “Steps to Reproduce” and “Expected Result” on a Bug’s “create” screen, but not on a Story’s “create” screen.
- Example: Create one standard for all development projects and another standard for support projects, not one custom configuration per Jira project.
- Create generic screens and schemes so they can be shared between projects.
Other articles in this series:
- Why Form Design in Jira Matters – How you design your forms will impact the quality of data you receive, and much more!
- Layout and Flow: Creating User-Friendly Forms in Jira – Form layout affects completion rates and user frustration. We’ll discuss the right way to do it.
- Writing Good Form Questions in Jira: Part 1 – How do you choose the right words, field types and validation levels? This article will dig into the nitty gritty of creating good form questions.
- Writing Good Form Questions in Jira: Part 2 – Choice questions are great for collecting structured data. We’ll look at the options for choice questions and discuss ways to influence, or mitigated influence on the user.
- Things to think about when converting forms in Jira – Bringing a process into Jira for the first time? Don’t just copy forms straight across. This is a chance to make improvements.
- Efficient Jira Screens and Jira Service Desk Request Forms – Jira screens and JSD request forms aren’t the same. Here’s how you can make each one work for its audience.
- Tips for Creating good forms/screens in Jira – Learn how you can leverage Jira features like tabs, workflow transitions and icons to create better forms and screens.
One thought on “Efficient Jira Screens and Jira Service Desk Request Forms”