Advanced Jira Administration: Getting into the Scheme of Things

A practical example for a development project

Let’s say you create specific Jira issue types because you want to collect a different data set for each type, and because want the different issue types to use different workflows. So what do you do next? How do you tell Jira what information to collect for each issue type? Should you create screens or a field configuration scheme first? What’s the difference between an issue type scheme and an issue type screen scheme? How do you associate an issue type with a workflow?

Understanding Jira schemes and how they interact with each other is one of the most important, and most challenging parts of Jira administration. My new Advanced Jira Administration course will help you understand:

  • The nine different Jira schemes and what each one does
  • Where to find the schemes used by a given project
  • The hierarchal relationship between screen schemes and issue type screen schemes
  • The correct order for creating screens, screen schemes and issue type screen schemes
  • How to remove a screen, screen scheme or issue type screen scheme
  • How to share schemes across multiple projects
  • When and how to create custom schemes
  • And much more
The course contains challenges, quizzes, downloadable handouts, and personal stories.

In this course, we’ll discuss real-life Jira scheme examples, areas where it’s easy to go wrong, and best practices for creating and managing schemes. The course includes clear explanations, demonstrations, and challenges (with solutions!) to try in your Jira application.

Once you understand Jira schemes you’ll have the keys to unlock Jira efficiency and scaleability.


Rachel Wright’s Jira and Confluence
Admin and User Courses on LinkedIn

Not a LinkedIn Learning member yet? Access to my courses and others is included with your Premium subscription!

New Course – Jira: Advanced Administration

Jira: Advanced Administration with Rachel Wright
Take “Jira: Advanced Administration” with Rachel Wright

Life is short. Jira is complex. There simply isn’t time to make all of the mistakes and learn everything you need to know by trial and error. I’ve compiled over eight years of lessons learned in my Jira Basic and Advanced Administration courses. The advanced course is available now on LinkedIn! It will help you navigate the complexities of Jira and find the right balance between user support and application functionality. Take this course to correctly configure your application and make sure it stays clean, manageable, and flexible.

Course Structure

The Jira: Advanced Administration course picks up where the Jira: Basic Administration course leaves off. The advanced course is designed to help you understand and internalize Jira concepts by including:

  • Real world examples of what to do, and what not to do taken from my personal experience
  • Explanations of the latest Jira jargon (ie. Company-managed projects vs team-managed projects)
  • Tips and best practices
  • Demonstrations
  • Challenges that you can try in your own Jira application
  • Quizzes to ensure understanding and build your confidence
  • Handouts
  • And more

While the examples used in the course are from Jira Software, the lessons can also be applied to Jira Service Management and Jira Work Management projects. All deployment types (Cloud, Server, and Data Center) are included.

Course Content

The course takes a deep dive into topics such as configuring global permissions, understanding scheme hierarchy, creating custom schemes and custom workflows, managing project settings, working with groups and roles, and controlling access to information.  

Your job as a Jira administrator is to give your teams the functionality they need and ensure the long term health of your Jira application. We’ll discuss when and how to make customizations and how to choose from the thousands of available Jira apps and extensions.

Finally, we’ll also look at advanced Jira features such as creating issues from email and issue collectors, importing data into your Jira instance, and streamlining process with automation.

Knowing the best way to solve a problem and how it will impact your application in the future is the difference between a good Jira administrator and a great one. If you’re a newly minted Administrator, an experienced JA looking for guidance on taming an overgrown Jira instance, or a determined perfectionist who’s trying to set things up right the first time – then this course is for you!


Rachel Wright’s Jira and Confluence
Admin and User Courses on LinkedIn

Not a LinkedIn Learning member yet? Access to my courses and others is included with your Premium subscription!

Coming Soon – Jira: Advanced Administration

My new Jira: Advanced Administration course is now available! Take the course on LinkedIn now.

Access to my courses and others is included with your Premium subscription!

About the Course

Jira is the industry standard for tracking work, tasks, and strategic company initiatives.  The software is infinitely flexible and customizable, which is both a blessing and a curse.  The goal of the Jira administrator should be to configure application settings to support the needs of the organization and ensure the health of the application in the future.  This requires an intimate understanding of Jira’s capabilities, global options, and scheme configuration.

In this advanced Jira administration course, you’ll learn:

  • The most important configuration options like general settings and global permissions
  • How schemes work together to power Jira projects
  • How to create custom projects, issue types, workflows, screens, and custom fields
  • How to manage project-specific settings like components and versions
  • Working with groups and roles for easy user management
  • How to restrict access and share information with permission, issue security, and notification schemes
  • Ways to extend Jira with apps, connections, and integrations
  • Advanced features like importing data, creating issues from email, adding custom events, and automation
  • And more

“Knowing the best way to solve a problem and how it will impact your application in the future is the difference between a good administrator and a great one.”
– Rachel Wright


Rachel Wright’s Jira and Confluence
Admin and User Courses on LinkedIn

7 Custom Fields Every Jira Application Needs

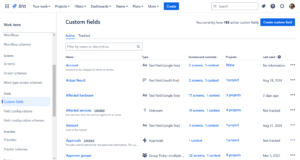
As a Jira administrator you should choose your custom fields carefully. Too many fields are a headache to maintain. In our custom field series, we’ve shared our tips for battling custom field bloat, auditing your fields list, and reducing your field count. Now we’d like to share some custom fields we recommend that you do create.

In Keeping It Clean: Containing Jira Custom Field Growth we recommended sharing custom fields with different teams across the organization. These 7 fields are intended to be used by many teams in many Jira projects.

Recommended Custom Fields

1. Requested

Custom Field Types
Custom Field Types

Field type: Date Picker

Create a “Date Picker” type field and name it “Requested.” Place this field on a project’s “Create” screen and use it to answer the question “When would you like this request completed by?

This field is different from the “Due Date” field, which signifies when the team can actually accommodate the request. The “Due Date” field should be populated after a request is reviewed for understanding and prioritized. In most cases, that field should not appear on the initial “Create” screen.

Requested vs Due Date Fields

Consider this scenario: The Legal team needs an update to the terms and conditions page on the company web site. They create an issue for the Development team with a requested date of March 15. The Development team receives and considers the request. Since it’s of “Medium” priority, they slide the change into their next release, which is March 22. These two fields have easily helped convey urgency and communicate ability.

Recommendation
Always place the “Priority” field before a requested date field on a screen. Collecting the importance before a date is entered may help set realistic expectations.

2. Category

Field type: Select List (multiple choices)

The built-in “Components” field is a great way to categorize (and automatically assign) work. But what if you need a second categorization method? Create a “Select List (multiple choices)” field and name it “Category”. This generic name is important and ensures that the field can be used to cover many scenarios.

Custom Field Context

Custom Field Context

Next, use Jira’s “Contexts” feature to display different selection values in different projects. For example, the Legal team categorizes their work with selection values like: Contract, Service Agreement, Litigation, etc. The Security team
categorizes their work with options like: Denial of Service, Information Disclosure, and Injection. Using a custom field context allows you to use one field to support many scenarios.

Recommendation
Always add an “Other” selection to cover all potential non-listed responses.

3. Department

Field type: Select List (single choice)

Which department generates the most requests for your team? That’s useful information for reporting! Unfortunately, Jira doesn’t know information like a user’s department name, team name, manager’s name, or phone number. While it is possible to store these additional details in a user property, there’s no easy way to leverage that data without custom development.

Instead, create a “Select List (single choice)” field and name it “Department.” Create one selection value for each department in the company and ask the reporter to choose the appropriate one on the “Create” screen. Easy!

4. Team

Field type: Select List (single choice)

Same as above. Create a “Select List (single choice)” field and name it “Team.” You could also couple the concept of “Department” and “Team” in one field by using the “Select List (cascading)” type. First the user chooses a department and they choose their team from a sub-set of selections. Now you have an easy way to query who the work is for.

Select List (cascading) Field

5. URLs

Field type: Text Field (multi-line)

It’s common that Jira issues are related to data from other websites and applications within and outside the company. For example, the Development team may need links to vendor documentation for their integration project. The Facilities team may need a link to the purchasing policy Google Doc for large equipment orders. The HR team may need to link to an employee’s record in a third-party employee resource application. When external applications are integrated with Jira, linking is easy. But what do you do for all those other applications that aren’t connected?

Create a “Text Field (multi-line)” field and name it “URLs.” Users can enter an unlimited number of links to other online areas without the need for one custom field per URL. Jira will even make the URLs clickable on an issue’s “View” screen, as shown in the screenshot.

Text Field (multi-line) Field with Links

Text Field (multi-line) Field with Links

6. IDs

Field type: Text Field (single line)

Sometimes you need to associate Jira issues with records in other offline or inaccessible applications. For example, a purchase order number from desktop accounting software, an ID in a vendor’s system, or a serial number on a piece of equipment. Just like the URLs field above, individual custom fields are often overkill. Instead, create a “Text Field (single line)” field and name it “IDs.” Users can enter ID numbers as comma separated values.

Text Field (single line) Field with Identification Numbers

7. Notes

Field type: Text Field (multi-line)

Finally, sometimes users need to enter more information that doesn’t belong in the standard “Description” field. Create a “Text Field (multi-line)” field and name it “Notes.” This generally named field can be used in different ways in different projects. Use a Field Configuration scheme if you need to provide a project or issue-specific field description.

Now there’s no need for an “Information” custom text field, an “Instructions” field, or a “Business Justification” field. All those lovely details can go in a single field.

Recommendation
If you’re not planning to query for or report on a piece of information, don’t devote a custom field to it.

Conclusion

Carefully planning your custom fields makes Jira administration easier. Creating generic fields for use by multiple teams is an easy way to support the needs of your users and limit the custom field count at the same time.

Which custom fields do you use across multiple projects? What strategies help you reduce the need for custom fields? Share your tips and tricks in the “Comment” section below.

Keeping It Clean: Containing Jira Custom Field Growth

You did it!  You auditeddeleted, merged and substituted and now your Jira instance only has the custom fields it should have.  Congratulations – that was hard work!  Pat yourself on the back, eat some chocolate, do whatever you do to celebrate.  Then take a deep breath and get ready to go to work again, because now that you’ve got your Jira instance nice and clean, you need to take a few steps to keep it that way.

The good news is that custom field clean-up isn’t like laundry, where you never really get it all done.  Once you’ve cleaned up your instance you can put processes in place to keep it that way.

When to Create a New Jira Custom Field

There are times when creating new custom fields is justifiable, but you want to make sure it’s really necessary before you create one.  Here are a few things to consider:

  • Is it needed?  In tech, we’re often tempted to do things just because we can. That’s not a good enough reason to create a custom field.  When users request a new field, ask them for the business case for collecting that piece of data. 
  • Does the data need to be in its own Jira field?  Will this data be queried or reported on later?  If not, could you just as easily capture it as a ProForma form field?  Or prompt users to include it in the Jira description field?

  • Would the field be used by different teams across the organization?  Jira assets should be shared whenever possible.  Making usability across multiple teams one of your criteria will help contain custom field expansion. 
  • Is there a Jira system field that you can use?  Make use of existing options. Teams can set their own protocols for what to include in a summary field versus a description field, or create a project-specific plan for how they will use the label field, etc.  Encourage users to use what’s there before asking for more.

In order to have the above information whenever a new field is requested, you’re going to want to implement a process for requesting new custom fields.  ProForma offers a template that users can use for requesting custom fields and Rachel Wright offers a new custom field request worksheet

In the Jira Strategy Admin Workbook, Rachel also recommends publishing a list of currently available custom fields.  This encourages users to look and see what’s already there before requesting something new.

Custom Fields and Next-Gen Projects

Note that these processes assume that you’re working the old-fashioned way, with traditional, classic, old school Jira projects.  If you’re using Cloud, then you may have empowered your users to create “Next-gen” projects. Next-gen projects are pretty new and it’s fair to say that the jury is still out.  The idea is that users will be empowered to create their own projects, issue types and custom fields.  These projects are self-contained and the inevitable balloon of new custom fields should not impact Jira performance. However, there’s nothing to prevent users from making errors such as misspellings and incorrect field types – errors which they may, or may not know how to clean up.

So what are our recommendations for managing custom fields in Next-gen projects?  First, the new project capabilities are configurable.  The default setting is “anyone,” but you can decide which groups to grant this power to.  Once you do decide, give these newly empowered users some training, which should include when to and when not to create a new custom field. Initially, alternatives may be more limited for Next-gen projects than for classic Jira projects.  Like many Jira apps, ProForma doesn’t yet work with Next-gen projects, but as use of Next-gen projects expands, options will too.

Will be exploring the possibilities and impact of Next-gen projects in upcoming articles.  In the meantime, enjoy hanging out in your nice clean Jira instance!

Reducing Jira Custom Fields through Substitution

One of the principle advantages of using ProForma – the app that lets you create forms that embed in Jira issues – is that it allows teams to collect customized data without needing Jira custom fields.  In the previous article in our series on reducing custom fields, we discussed how to delete, hide and merge custom fields.  In this article, we’ll explore the fourth option – substituting a form field for a Jira custom field. 

When to Use

This is the solution that provides the best of both worlds.  You get to have the data without having the custom field.  That being said, there are some limitations you need to consider before implementing this solution.

Limited Search Capability

Currently, fields on ProForma forms are not searchable in Jira.  There are two ways you can work around this.  For fields that are frequently queried and reported on, you can link a form field to a Jira field.  This allows you to collect the data in one place and still have access via JQL queries and Jira reports.  However, this doesn’t help as far as reducing fields.

The other option is to download a spreadsheet of forms responses and search there.

We are working on creating functionality which will allow you to link multiple form fields to one Jira field (for instance, the description field). This will allow teams to collect and view the information in a structured manner, while still having the data available for searching in Jira.  We anticipate releasing this functionality in early 2019.

Conversion Process

The other thing to keep in mind is that the conversion process (described below) is not for wimps!  We recognize that it’s a bit labor intensive and we are working to develop an automated process.  (For this reason, it’s highly recommended that you triage incoming requests for new custom fields and use form fields in lieu of custom fields as much as possible.)

Preparing the People

Reassure users that they will still have the data.  If users are new to ProForma, you want to show them how ProForma is used on another project in order to reduce their concerns.  You’ll encounter less resistance if users understand that they’re not losing any data.

Second, knowing that the conversion is a bit involved, you should prepare your users to be patient.  You will also want to work closely with Project Admins – letting them do some of the tasks (such as building the forms) – especially if you’re substituting fields across multiple projects.

How to Do It

1. Build a form that includes the target fields.  Each field has the option of being linked to a Jira field.  Be sure to create a field for each custom field that you wish to eliminate.  For each of these fields, use the Link Jira Field option to link the form field to the existing Jira custom field.  Note that you may want to link other fields as well.  For instance, it’s very useful to have a “What’s the problem?” field link to the Jira summary field.

  • The form can include as many fields as needed (not just the fields that are being converted).  Create forms that will be useful for the team after the conversion process is complete.
  • You may be able to get a head start by modifying a form from the ProForma template library.
  • Organize fields into logical sections.  Add instructions.  Use ProForma features such as validation, conditional logic and field-level hints/descriptions to make your forms as user-friendly and useful as possible.

2. Once the form has been built, you will need to add the form to all of the relevant issues.  Depending on your situation, this could be every issue in the project, or only those issues that have data in the custom fields you’re converting.  Currently, add ProForma forms to issues has to be done manually.

3. Next you need to go through and open each form and check that the contents are correct.  The target form fields should contain the data from the custom fields.  Save and Submit the form on each issue.  Note that the data doesn’t get locked into ProForma until the form has been submitted.

The data from the custom field is now present on both the custom field and the form.  Be sure to click Submit to lock the data in the form.

4. Now return to the form builder and open the form.  Go to each of the form fields associated with a custom field you want to eliminate and unlink the Jira field. Remember to Save.

5. The populated form field is now independent of the Jira custom field.  To verify that you have completed the process, run a JQL query for  [custom field] NOT EMPTY.  Then download a form response spreadsheet and compare the results.

6. Once you’ve confirmed that the forms contain the custom field contents, you can delete the custom field following the directions here.

We recognize that this is a labor intensive process and we are working to develop an automated process for converting fields in large projects. Please contact ThinkTilt if you would like to be notified when that functionality is released.

**Note that the process described above is for traditional Jira projects (Business, Service Desk or Software).  ProForma is not yet fully functional with Next-gen projects.

Deleting, Hiding & Merging Jira Custom Fields

Congratulations!  You’ve audited your Jira custom fields and even decided on which methods you’ll use to reduce them.  So now it’s time to get started. In this article, we’ll provide the steps for three of the options:  deleting, hiding, and merging Jira custom fields.  For each option, we’ll not only look at the steps for execution, we’ll also discuss when you should use it and how you should prepare users for the change.

Let the pruning begin!

Deleting Jira Custom Fields

When to Use

Don’t do this lightly.  Deleting fields will also delete the data they hold and this act cannot be undone.  Therefore, this method is best reserved for fields that were created, but never used (a scenario that occurs more often than one might think), or in cases where the data has been moved to another field.

Preparing the People

Users will not react kindly to having something they feel they need removed.  So check first to see if anyone is using the field.  If they are, provided a substitute (we’ll discuss how to do this in the next post) or a work-around before deleting the field.  You’re a hero when you give users functionality, but a devil when you take it away.

How to Do It

  1. Select Jira settings > Issues
  2. Under Fields, select Custom Fields
  3. Find the custom field and click the gear icon
  4. Click Delete to remove the custom field and any information entered in the field from all issues.

Hiding Jira Custom Fields

When to Use

Although this method doesn’t truly reduce the number of custom fields in your instance, it does allow you to declutter your screens.  This is a good method to use for custom fields that were used in the past and contain data that you don’t want to use, but are not (or rarely) used now.

You can also hide fields as an intermediary step before deleting them.  Hide the field, wait a week or two to see if users miss it, and if not, then delete the field.

Preparing the People

Most of the time when you use this method it will be for fields that were important in the past, but are no longer in use.  Check with the Project Admins to confirm that this is the case.

Note that if you’re told, “Oh no, we need that field!” but suspect otherwise, you can query for [custom field] NOT EMPTY and then sort by last updated date to see how frequently and how recently the field has been used.

How to Do It

To hide a Jira custom field go to Project > Project Settings > Fields.  Find the custom field and click Screens.  Click Remove.

Merging Jira Custom Fields

When to Use

In the rush to create what we need, we often forget to check if it’s already there.  Your audit may reveal that multiple custom fields have been created which essentially do the same thing.  In this case, you should select the one best option (correct field type and most generic name) and merge the other fields into it.

Preparing the People

The key in this case is communication.  You simply need to let people know that the field they formerly used (XYZ Project Start Date) has now been renamed (Start Date).  You can use an announcement banner (available on the System admin menu) to communicate with all of your users.

How to Do It

  1. Add the new (correct) field to all relevant issue type(s).
  2. Run a query to return all of the Jira issues you wish to update (all issues in which have data in the old/incorrect field).
  3. Adjust the columns to show the summary, issue key, the old/incorrect custom field, and the new/correct custom field.
  4. Click Export Excel CSV (current fields).
  5. In your CSV file, remove any unnecessary columns, and everything but the header and data rows.  (The export may add extra rows of footer/header content).  This is also a good opportunity to “clean up” your data – fix misspellings, etc.
  6. Now go to the Jira Administration menu and select Jira Settings > System.
  7. Select External System Import (under the Import and Export heading) in the left hand navigation bar.
  8. Select CSV.
  9. Click on the Choose File button and browse to your CSV file.  Click Next.
  10. Select your project.  Note that you can also add an email suffix and adjust the date format on this screen.  Click Next.
  11. Map your fields including the issue key, summary and the relevant custom fields:
    1. Issue Key (CSV field) > Issue Key (Jira field)
    2. Summary (CSV field) > Summary (Jira field)
    3. Old/incorrect custom field (CSV field) > New/correct (Jira field)
  12. Click Next.  Jira will make the update and indicate the result.
  13. You can repeat your original search to see the data from the old/incorrect field is now populating the new/correct field.
  14. Follow the instructions above for deleting the old field.

Stay Tuned

The next article in this series will describe how you can substitute a ProForma form field for a Jira custom field.  It’s the perfect solution for times when teams need the data, but don’t need to query or report on it.

Time to Decide: What to do with all those Jira Custom Fields

In a previous article, Rachel Wright outlined a process for auditing Jira custom fields.  If you’ve completed this process, you now have an idea of all of the custom fields in your Jira instance.  Finding out what you have is an important first step.  Next you need to decide what to do with them.

If you haven’t already, log your information into a spreadsheet, a Confluence page or use the free Jira Custom Field Audit worksheet.  At a minimum, you will want to collect the following information:

  • Name – The name of the Jira custom field
  • Type – Knowing the field type can be useful in determining if the field can be merged
  • Description – What the field is for
  • Created by – Was the field created by Jira, by a person or by a plugin/app?
  • Used by – Who is or has used this field?  Which Jira projects?
  • Currently in use – Is anyone using the field now?

I found all my custom fields.  Now what do I do with them?

Follow the recommendations Rachel describes, or try the SQL queries provided by Atlassian.  Once you’ve filled in the above information, you need to take the next step – engaging with Project Admins, business owners and other users to find out if and how the fields is being used, and to determine if another solution might work just as well or better.  Ask questions such as:

  • How do you use the data in this field?
  • Do you query the field? (You can verify this by checking to see if the fields is included in any filters.)
  • Do you report on the field?
  • Does anyone remember how you handled this data point before you had the custom field?

As you talk to business owners, users and project admins, it’s important to be clear that your aim is not to take needed functionality away from them. There are many ways to reduce custom fields without losing current functionality.  After you’ve completed your research and your conversations with business owners, you can recommend one of the following options for each custom field:

  • Keep it
  • Merge it with another Jira custom field
  • Substitute it with a field on ProForma form
  • Aggregate it with other data into one field
  • Retire it
  • Delete it

We’ll discuss how to do each of those things in a future article.  For now focus on deciding what the future of each of your custom fields should be.

When to Use Each Option

Keep it
Don’t change a thing.  The field is necessary just as it is.

Merge it with another Jira custom field
Your Jira instance may have accumulated multiple custom fields that are essentially the same (for instance, multiple sets of start and end dates). These can be safely merged together into one field that has a generic name.

Substitute it with a field on ProForma form
Many data points are needed in order to handle a request (service desk projects), or track information that is important, but rarely queried or reported on.  You can still collect specific, structured information without custom fields, by collecting the data on a form.

Aggregate it with other data into one field
Aggregating is another good option for data that is collected for purpose of providing a service, background info, etc., but that is only occasionally queried or reported on.  This involves collecting the data on a structured form, then storing the data from multiple form fields in one Jira field.

Hide it
You can hide custom fields that were used in the past, but are no longer necessary.  This allows you to preserve the data while decluttering your screens.

Delete it
Delete fields that are not being used and that do not contain any data that needs to be preserved.  It’s recommended that you not delete custom fields that were created by Jira (and in many cases Jira won’t let you).

Add a Recommendation column to your spreadsheet and log the selected option for each field.  You now have a plan for each of your custom fields. Watch for the next article in this series, where will discuss exactly how to apply the above options.

How to Audit Your Jira Custom Fields

How many custom fields do you have?  For most of us the answer is: too many!  With research and diligence, you can clean up your duplicate and unused custom fields and get your count down to a manageable number.

The first step in any clean up process an audit.  You need to understand what fields your application has and how much that differs from the default Jira set up.  Use the free Jira Clean Instance worksheet to compare your application to a default installation.  Use this to get a count of all your standard and custom fields.

There are a few ways to approach your audit.  You can do a manual examination, use an add-on from the Atlassian Marketplace, or use a combination of both.  For helpful add-ons, check out:  Cleaner for Jira, Custom Fields Usage for Jira (Server only), and Admin Tools for Jira (Server only).  Jira Data Center users can leverage the built-in Custom Fields Optimizer.

While these plugins can help tremendously with your research, only a human can determine the value of a specific custom field for your organization.

Examination

Next, make a list of all field names and types for examination.  Copy the all the fields on your Custom Fields admin page and paste them into Excel or Confluence.  Use the free Jira Custom Field Audit worksheet to enter your data, collect your research findings, and total the fields to remove.  Now that you have the list, start researching and classifying each field

First, flag the fields created by Jira.  These fields are likely needed, locked and can’t be removed.  Don’t spend time researching these.

Second, flag the fields created by an add-on or plugin.  When plugins are deactivated or uninstalled, their custom fields remain.  You’ll need to determine if data in those fields needs to be retained.

Finally, flag all the fields created by admins.  These will require the most research.

Research

It’s time to find out everything you can about each add-on or admin created custom field.  Start by determining which plugin created which field and add this information to your spreadsheet.  Look for clues in the following places:

  • Jira’s application audit log,
  • the add-on audit log,
  • the field’s description on the “Manage add-ons” admin page,
  • login as an end user, use the add-on, and see which fields are displayed,
  • or check the plugin’s documentation.

Next, research the remaining admin created fields.  Are there duplicates, misspellings, or poor naming choices?  Are any fields associated with unused projects?  How is each field used today?

Determine the scope of each field’s use by looking in the following places:

  • the Custom Fields admin page,
  • on screens,
  • in workflow behaviors (conditions, validators, and post functions),
  • and in user JQL queries.

TIP:  For each field, do a JQL query and note how many issue were found, how many issues are in unused projects, and the business value of the data returned.  Just because data is returned doesn’t mean it’s still useful!

Finally, check how many users have saved queries using the custom field.  If you have Jira Server or Data Center, and read-only access to the Jira database, you can get this information from the “reqcontent” column in the “searchrequest” table.

Next Steps

Now that you’ve uncovered some unneeded fields, it’s time to take action!  We’ll cover the clean up process in an additional article in this custom fields series.

Take the Jira Custom Fields & Clean Up Course!

Learn how custom fields work, how to determine when a new custom field is warranted, and how to clean up custom fields added by application admins and add-ons.
Take the 20 minute online course

Battling Jira Custom Field Bloat, Step by Step

“I have over 3,000 custom fields and everyone says I need to talk to you.”

That was one of the comments we heard at Atlassian Summit.  It’s true. ProForma is a great way to have all of the custom data, without the custom fields.  ProForma forms embed in Jira issues, allowing you to include all of the fields you need, without cluttering your Jira instance or degrading Jira’s performance.

We think simplified Jira administration, particularly with regard to custom fields, is one of the key benefits of using ProForma, and something we’ve discussed in previous articles:

However, talking to Jira Administrators at Summit made us realize that we’ve neglected a big part of the problem.  You don’t just need a way to limit the addition of new custom fields, you need a way to deal with the ones you already have.  So we’ll be focusing our upcoming content on how to deal with custom field bloat.  Once again, we’ll be teaming up with author and Jira super-user, Rachel Wright.  Rachel worked with us on a previous series of articles, which is now available as the Effective Jira Administration book. We’re looking forward to tapping into her expertise on managing Jira custom fields.  

ProForma Forms & Custom Fields for Jira

Cleaning up Jira Custom Field Bloat

Regardless of whether you’re using Cloud, Server or Data Center, our series will offer step by step guidance for:

  • Auditing
    Find out exactly what custom fields you have, what project(s) they’re in and if/how they are used.
  • Triage
    The next step will be to categorize your custom fields.  You’ll sort out how the custom fields were created (by an admin, an add-on, etc.), whether or not they’re duplicates, if they contain errors, and how they are used.  We’ll outline the process for sorting your custom fields into ones that stay, ones that go, and ones that get converted. 
  • Conversion
    Next, we’ll outline a process for converting needed fields to ProForma, for merging duplicate fields, fixing errors and for retiring fields that are no longer needed.
  • Documentation
    Finally, we’ll make sure that you’re left with an easily accessible map that will show which custom fields remain and which were converted to fields on ProForma forms.  Having this information at your finger tips will make it easier to respond to requests for new custom fields. 

The goal is that by the end of the process, your teams will still be able to collect all the data they need, but you’ll have your custom fields down to a manageable number.  (You get to decide what that number is.)

Next-gen Projects

For those of you using Jira Cloud, we’ll also discuss strategies for how to manage custom fields (and Jira administration in general) now that any user can create independent projects.  (If this makes you nervous, you’re not alone.)  We’ll focus on communication strategies and ways to educate users about best practices in Jira, with the aim of being “open”, without opening up a huge can of worms for Jira administrators.

0
    Your Cart
    Your cart is empty. Go add some materials!Return to Shop