
Default Jira Project Permissions
Sometimes it’s important to understand how far your Jira application has strayed from the default configuration. Was that setting there […]
Sometimes it’s important to understand how far your Jira application has strayed from the default configuration. Was that setting there […]
Sometimes it’s important to understand how far your Jira application has strayed from the default configuration. Was that setting there
Jira Strategy Admin Workbook The Jira Strategy Admin Workbook will save you time, money and frustration. This book is different
這些翻譯的奇妙翻譯,編輯和審閱者是: 鐘冠智 Kerwin現任Atlassian 大中華區負責人前CSDN Atlassian Agile DevOps諮詢顧問 大中華區首位ACP-100認證專家Atlassian 中文社群發起人 數位轉型的時代——「每家公司都是IT公司」大勢所趨,敏捷DevOps成為轉動這一齒輪最重要的推手。尤其,Atlassian被喻為「敏捷DevOps界的愛馬仕」,其明星產品Jira在這波浪潮中紅遍大江南北。台積電、聯發科、鴻海、滴滴出行、華為、中石油、百度、中國移動,乃至美國航天局NASA、Spotfy——全球500強企業中,超過80%公司成功使用Jira實現他們的敏捷DevOps轉型。 2018年年初,中國Jira社區一成立,年底立馬突破1000人,無論是敏捷教練,DevOps專家,還有各家Jira管理員和用戶們,紛紛投入探討落地實施研究,Jira之火在中國市場不斷延燒。而Jira之所以能穩坐敏捷DevOps工具鏈寶座,絕對歸功於強大的開放兼容性,它可以和各家開源與商用軟件接口,包括Gitlab,Jenkins,Azure DevOps,Sonarqube等,形成龐大的生態圈。 另我驚訝的是,儘管Jira在Agile DevOps扮演舉足輕重的地位,至今中國市場上仍然沒有任何一本關於Jira的中文專書。 回想起北京2018年第一次的社群大會,當時社區發起人之一的馬亮和我說,「有這麼多優秀的Jira老師和用戶,為何沒有一本正式的書籍?鐘老師要不咱們來翻譯看看。」 我馬上想到之前在準備ACP-100證照讀到的優質好書《Jira Admin Stragtegy Workbook》。 本書作者Rachel
Jira策略管理實戰手冊: 為系統管理員提供設定、清理和維護Jira的範本 作者: Rachel Wright 譯者:Kerwin Chung & Daniel Huang 此實戰手冊包含: 此實戰手冊向您展現: 譯者 關於翻譯,編輯和審稿人 示例章節 下載樣本
Jira策略管理实战手册: 为应用程序管理员提供配置、清理和维护Jira的模板 作者:雷切尔赖特译者:Kerwin Chung 此实战手册包含: 此实战手册向您展现: 前言 数字化转型的时代——“每家公司都是IT公司”大势所趋,敏捷DevOps成为转动这一齿轮最重要的推手。尤其,Atlassian被喻为”敏捷DevOps界的爱马仕”,其明星产品Jira在这波浪潮中红遍大江南北。滴滴出行、华为、中石油、百度、中国移动,乃至美国航天局NASA、谷歌——全球500强企业中,超过200家公司成功使用Jira实现他们的敏捷DevOps转型。 2018年年初,中国Jira社区一成立,年底立马突破1000人,无论是敏捷教练,DevOps专家,还有各家Jira管理员和用户们,纷纷投入探讨落地实施研究,Jira之火在中国市场不断延烧。而Jira之所以能稳坐敏捷DevOps工具链宝座,绝对归功于强大的开放兼容性,它可以和各家开源与商用软件接口,包括Gitlab,Jenkins,Azure DevOps,Sonarqube等,形成庞大的生态圈。 另我惊讶的是,尽管Jira在Agile DevOps扮演举足轻重的地位,至今中国市场上仍然沒有任何一本关于Jira的中文专书。 回想起北京2018年第一次的社区大会,当时社区发起人之一的马亮和我说,“有这么多优秀的Jira老师和用户,为何没有一本正式的书籍?钟老师要不咱们来翻译看看。” 我马上想到之前在准备ACP-100证照读到的优质好书《Jira Admin Stragtegy Workbook》。 本书作者Rachel Wright是全球第一批考取ACP-100认证的Jira专家,拥有多年实务经验,协助许多公司将Jira落地实施。在众多的外文Jira相关书籍中,我特别挑选本书作为中国第一本Jira专书,系因作者写作思路清晰,把许多坑毫无隐藏地揭露给所有读者。作为多年的Jira专家的我,看了这样无私的分享,真心觉得相见恨晚——“那些年我们跳过的坑”:字段地狱,复杂数据库,失控的工作流等等,在该书中都提出了良好的建议。很多事情如果能够提前一步知道该有多好,预防胜于治疗,非常推荐大家一定要阅读本书。 我特别将本书推荐给三种读者,第一,资深Jira管理员,它山之石可以攻玉,通過看到別的人的经验来学习,避免自己许多跳坑的过程。第二,希望考取ACP-100的团队,这个考试非常重视对于Jira的熟悉度和管理经验,只看手册的人很难具备这些知识,本书丰富的经验分享,非常适合备考的朋友们。第三,新入行的Jira管理员或是有兴趣研究的用户,本书深入浅出的介绍,会让各位很快地了解这样强大的工具如何实际落地。
As organizations continue to adopt digital technology, more and more teams are leveraging Jira to track their work. Here are
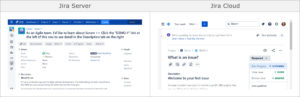
Are you migrating from Jira Server to Jira Cloud (or vice versa)? The user interfaces are similar, but there are