
Understanding the Atlassian Account and User Model
Do you have multiple Jira Cloud applications to manage? Here’s how they all work together in the Atlassian organization and […]
Do you have multiple Jira Cloud applications to manage? Here’s how they all work together in the Atlassian organization and […]
Between March 2025 and July 2025 Atlassian progressively rolled out a new navigation experience to all Cloud users in Jira,
In a previous article, I shared an example of my Jira Code, Snippet, and Example Library as a place to
I got my start in web development in the late 1990s. I taught myself HTML and spent every minute I
I just got a new client. They are a software development firm and they make the most amazing product! I’m
Where are you on your Jira journey? Most of us start out simply trying to survive the never-ending list of
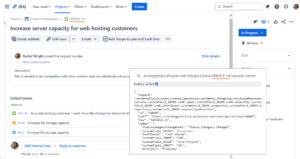
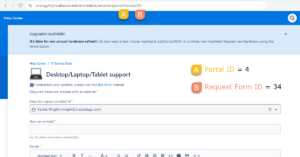
In the last article, I shared an easy way to find what you’re looking for by changing parameters in URLs
Who doesn’t love a shortcut? In addition to Jira’s keyboard shortcuts, another easy way to find what you’re looking for
Why do end users fear JQL? Too many of my clients exclusively depend on email notifications to find Jira issues.