Tip Relates To
| Application Type | Jira, Jira Service Management |
| Deployment Type | Cloud, Data Center |
| Audience | Application Administrators |
| Category | Importing, Custom Fields |
Tip
You already know you can import Jira items in CSV format. But did you know you can also use the import wizard in two other helpful ways? You can (1) update information in existing Jira items and (2) import options for single and multi-select lists.
Explanation
Let’s say you need a select list with one option for every country in the world. Instead of pasting over 100 options into Jira manually, use the import wizard to add them in bulk. All you need is one existing work item and a properly formatted CSV file.
Steps
- Create a single or multi-select custom field. Ex: A custom field named “Country”.
- Add the custom field to the desired screen(s) in your Jira space(s).
- Create one sample work item. Ex: DEV-1
- Create a CSV file in the following format:
Excel table view
| Work item key | Summary | Country | Country | Country | Country | Country |
| DEV-1 | Example item | Afghanistan | Albania | Algeria | Andorra | Angola |
Work item key,Summary,Country,Country,Country,Country,Country
DEV-1,Example item,Afghanistan,Albania,Algeria,Andorra,Angola
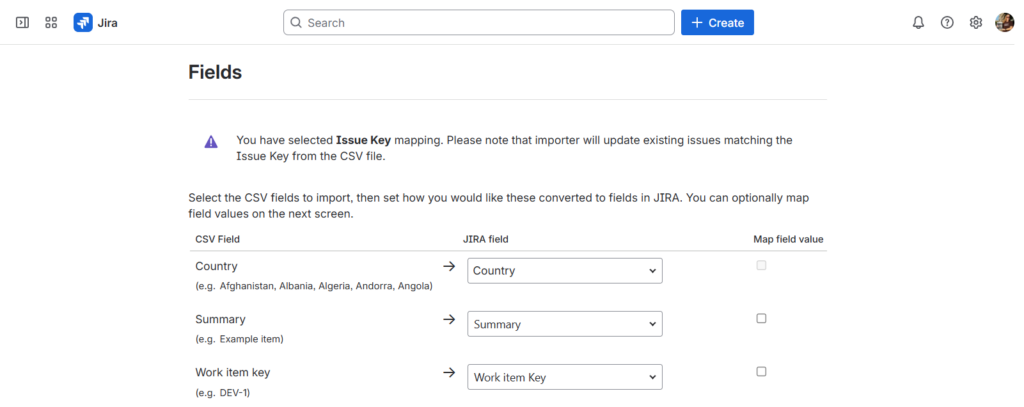
Name the first column “Work item key”, name the second column “Summary”, and add a column called “Country” for each selection value to import. The above example will import the five countries listed.
- Finally, use the original CSV importer to import one or more values as custom field options.
- Visit: Admin > System > External system import > Switch to the old experience > CSV
Notes:
- This can only done from the admin version of the CSV importer. (End users can import work items but not edit them.)
- The CSV file must contain a single work item and its “Summary”.
Resources
- Bulk add custom field options with the Jira CSV Import tool – https://support.atlassian.com/jira/kb/how-to-bulk-add-options-to-custom-fields-via-the-jira-csv-import